You can transform your living space with easy woodworking projects in just a few hours or over a weekend. No need for years of expertise – a simple coat rack takes only an hour to build.

Beginner woodworking projects are simpler than you might think. We found that there was no need for complex tools or huge workshops. A single sheet of plywood can create four magazine bins. Quick weekend builds like wooden doormats show that woodworking is more available than ever.
We picked 13 quick and easy woodworking projects you can start this weekend. These beginner-friendly projects blend simplicity with practical use. You can build spice racks that store 18 seasonings or rolling work tables that fit your space perfectly. Time to grab your tools and start building!
Build a Rustic Floating Shelf

Image Source: YouTube
Floating shelves add style and storage space to any room. A rustic floating shelf can support between 45-50 pounds per wall stud with proper installation55.
Required Tools and Materials
This beginner-friendly project needs a 1/4-inch cabinet-grade plywood sheet, 1×2-inch whitewood boards, heavy-duty anchors, wood stain, and simple tools like a drill and level56. A carbide drill bit helps create precise holes, and wood screws ensure secure mounting.
Step-by-Step Building Process
- Cut the 1×2 boards to your desired shelf width and depth
- Create support framework using wood glue and screws
- Cut plywood pieces for top, bottom, and sides
- Attach plywood using 1-inch brad nails
- Fill gaps with wood filler to create uninterrupted look56
Mounting Instructions
Start by finding wall studs with a stud finder or the knock test method. Mount brackets into at least two studs to get optimal support55. Drywall anchors in remaining holes provide extra stability. Secure the shelf to support rods with set screws or silicone adhesive55.
Finishing Options
Apply multiple thin coats of stain and sand between applications with 400-grit sandpaper57. Add 3-4 layers of water-based polycrylic finish to protect the wood. A final coat of beeswax polish moisturizes the wood grain and creates lasting beauty57.
Simple Wooden Serving Tray

Image Source: Instructables
A wooden serving tray combines style with function and makes a great weekend project. This project is perfect for beginners because it needs simple tools and gives professional results.
Wood Selection Guide
Hardwoods like maple, walnut, and cherry are excellent choices for serving trays because they’re durable and have beautiful grain patterns58. Teak works really well too since it resists moisture, which makes it perfect for serving food and drinks58. Pine can be a good choice if you’re on a budget, though it’s nowhere near as durable as hardwoods58.
Construction Steps
The base needs a project panel cut to 12 x 18 inches. You’ll need four frame pieces: two that are 12 inches and two that are 19.5 inches long59. Sand everything really well – start with 80-grit sandpaper and work your way up to 220-grit to get a smooth finish. The tray’s sides should be 2.25 inches high to look proportional60.
Handle Installation
Handles are crucial and need careful mounting. Drill holes 1.5 inches from the bottom of both short sides61. Rope handles need 5/8-inch holes that you can secure with decorative knots61. Metal handles work well too – just mount them with machine screws and make sure they’re countersunk properly so they sit flush62.
Protective Finish Application
Your choice of finish will substantially affect how the tray looks and lasts. Food-safe options like pure tung oil, mineral oil, or walnut oil work great63. To improve protection, mix mineral oil with beeswax – heat the oil and add beeswax equal to one-fifth of the oil volume63. Put on several thin coats and let each one dry properly before the next64.
Modern Plant Stand

Image Source: YouTube
Mid-century modern plant stands combine style with practicality and make an excellent project for woodworking enthusiasts. You can build these stands for USD 10-35, which saves money compared to store-bought versions that cost USD 1259.
Design Variations
We focused on clean lines and contemporary esthetics in the design. The best materials you’ll need are:
- Maple or rift sawn oak when you plan to stain
- Poplar works great for painted finishes
- Cedar gives you outdoor durability9
Building Instructions
The project begins with cutting a 10-inch circle for the top platform using a jigsaw10. The x-base support structure comes next and needs proper weight distribution to handle loads up to 75 pounds11. Half-lap joints work better than standard joints and improve stability. The pieces should be finished before assembly to avoid stain absorption problems in the joints12.
Height Adjustment Options
These modern plant stands come with adjustable widths from 8 to 14 inches11. Base heights range from 9 to 12 inches to fit different pot sizes13. Your pot’s dimensions plus 1 inch will give you the right platform width for stability14. A protective polyurethane coating shields against water damage unless you’re building for outdoor use10.
DIY Wooden Doormat
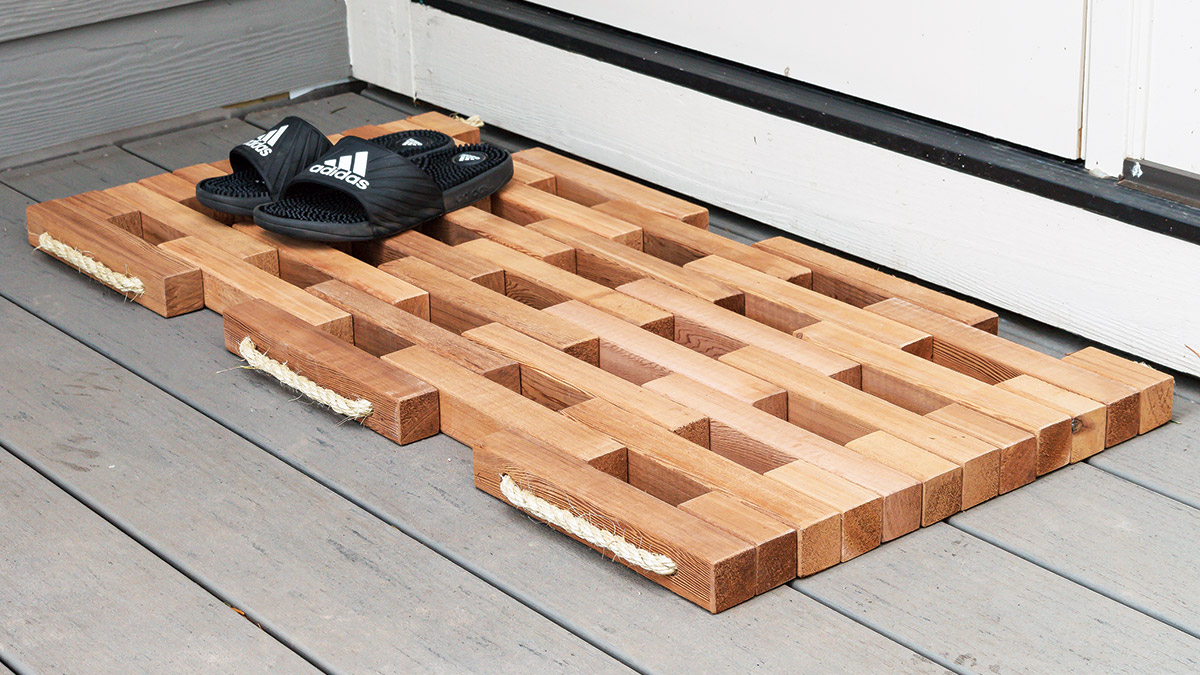
Image Source: Fine Woodworking
A custom wooden doormat brings rustic charm to your entryway and helps remove dirt from shoes. You can build this beginner-friendly project with weather-resistant wood that stands up to outdoor elements.
Material Requirements
You’ll need decay-resistant wood like cedar, redwood, or New Zealand Pine to make it last15. The project requires a crosscut saw, drill with 1/2-inch bit, sandpaper (150 and 220 grit), and outdoor wood finish16. Most doormats measure 30 inches long by 18 inches wide15, but you can adjust these dimensions based on your space.
Assembly Steps
- Cut wood slats to size – typically 30 inches for length pieces and 18 inches for width15
- Sand all pieces with 150-grit first, then move to 220-grit sandpaper16
- Create a frame using simple butt joints
- Space interior slats 3/8 inch apart using wooden spacers
- Secure each slat with galvanized nails17
Weather Protection Tips
We treated the wood with weatherproof sealant that lasts up to one year15. You should check the finish condition regularly throughout the year. Your outdoor doormat needs yearly refinishing based on weather exposure18. Cabot Australian Timber Oil in natural color works best as it creates a water-repellent barrier18. We ended up adding anti-skid pads on each corner to help with water drainage and prevent slipping19.
Compact Shoe Storage Bench

Image Source: YouTube
A shoe storage bench adds both seating and storage in one compact piece. You can build this practical project under USD 30.00 worth of lumber20.
Materials and Tools List
You’ll need two 2x8s, one 1×12, and a square dowel to build this bench20. The essential tools include a miter saw, pocket hole jig, drill, and sander. The finishing requires wood stain, polyurethane, and some simple painting supplies.
Construction Process
- Cut the seat boards from 2×8 lumber
- Make pocket holes along one seat board edge
- Join seat boards with 2 1/2-inch screws
- Cut the legs from 2×8 board at 10-degree angles
- Add back rail between legs
- Attach seat to base assembly20
Storage Compartment Design
The storage space accommodates 3-4 pairs of shoes comfortably2. The slatted shelf design lets air flow through and helps wet shoes dry faster2. Your shoes stay available and neat since the shelf sits at a slight angle21.
Finishing Touches
A Java gel stain creates a rustic look20. Sand the edges lightly before finishing. Add several thin coats of wipe-on polyurethane to protect the wood, keeping a 35-degree sheen22. Danish oil works well as an alternative that won’t drip23.
Wooden Wall-Mounted Mail Organizer

Image Source: Four Oaks Crafts
A wall-mounted mail organizer keeps your mail tidy and adds style to your space. This simple woodworking project needs few materials but offers great utility.
Design Planning
The organizer features a 36-inch tall by 9¼-inch wide main board with three slots spaced evenly24. We selected 1×10 whitewood boards because they’re durable and economical25. The slot spacing works best at 5 inches, 14½ inches, and 24½ inches from the top, which ensures your mail stays well-distributed26.
Building Steps
- Cut the main backboard to 36 inches length
- Prepare three front-facing pieces at 7 inches each
- Create six triangle braces for support
- Attach braces to front pieces using wood glue
- Install framing pieces around slots
- Sand all components with 120-grit sandpaper25
Your next step is to apply pre-stain wood conditioner to prevent blotching27. The Special Walnut stain by Minwax creates a rich finish, and Minwax finishing paste adds protection27.
Mounting Instructions
Start by marking your wall’s mounting points with a level28. Drill pilot holes – 1/4-inch for masonry walls or 1/16-inch for wooden walls28. Masonry installations need plastic anchors for proper support. The organizer needs heavy-duty screws, and you should check the level between each fastening point28.
Simple Wooden Coasters

Image Source: YouTube
Wooden coasters are a great first project to start woodworking. They help you learn simple skills and give you something useful. These handmade pieces guard your surfaces and show off wood’s natural beauty.
Wood Selection
Maple, cherry, and walnut make ideal woods for coaster projects. They give superior durability and beautiful grain patterns29. We used composite woods that give exceptional strength by bonding multiple wood layers together29. Cedar and redwood’s natural resistance to moisture makes them great choices for drink coasters29.
Cutting and Sanding
Start by cutting your wood into 4×4 inch pieces with 1/2 to 3/4 inch thickness30. Work with progressively finer sandpaper grits from 120 up to 320 to get an ultra-smooth finish31. Sanding between coats will give professional results and smooth edges30.
Pattern Ideas
You can create eye-catching designs by mixing different wood grains or contrasting wood types30. Wood burning adds unique designs while keeping the coaster’s function intact32. To make them more appealing, try keeping natural edge elements. Keep the main part to 4 inches but let edges taper naturally33.
Sealing Methods
Multiple thin coats of water-resistant finish protect your coasters best34. Danish oil soaks deep into the wood to improve grain appearance and durability31. Polyurethane or varnish gives the best moisture resistance – just let each coat dry properly34. A mix of mineral oil and beeswax creates a food-safe finish you can easily renew35.
Basic Tool Storage Rack

Image Source: Crystel Montenegro Home
You can build this practical tool storage rack in 20 minutes with just USD 10 worth of materials36. The rack helps organize tools and makes the most of your wall space.
Layout Planning
Start by laying out your tools on the floor to figure out the best spacing37. Measure how wide your tools are at the top to determine your backer panel’s length. The next step is calculating the right height for hanging tools37. Your tools’ placement should work with gravity to stay stable36.
Construction Steps
- Cut a 2×4 to your desired rack length36
- Prepare 10-inch blocks for tool spacing36
- Position first blocks 4 inches from each end36
- Install blocks with 2-inch gaps between them36
- Secure using self-tapping 3-inch screws36
Tool Organization Tips
Mount the rack at a height that works for you using proper wall anchors37. Make sure at least three screws connect to wall studs for the best support37. The rack’s functionality improves with adjustable shelves or a slotted tool rack that holds items at an angle3. Tools should be arranged based on how often you use them, with frequent-use items within easy reach1.
The rack’s design lets you customize it to match your needs3. This simple storage solution keeps your workspace tidy with tools ready when you need them38.
Decorative Picture Frame

Image Source: YouTube
Picture frames display our precious memories and give you a great chance to practice precise woodworking techniques. The project needs accurate measurements and careful assembly to get professional results.
Size Calculations
You should measure your artwork dimensions and add 1/16 inch for proper fitting39. Standard sizes need a frame width of 2.5 inches with a 3/4 inch thickness40. Make the rabbet depth 3/16 inches to fit the glass, with extra room for artwork and backing41.
Corner Joint Options
You can choose from these tested joint methods to assemble your frame:
- Half-lap joints give extra strength with more glue surface
- Mitered half-lap joints look great and stay strong
- Pocket-hole joints help you assemble simpler frames quickly42
Glass Installation
Anti-reflective glass cuts down glare while conservation glass blocks 99% of UV rays43. The glass fits in a routed channel 1/4 inch wide41. We used glazier points to secure the glass, but you can also use clear silicone adhesive for a permanent hold44.
Finishing Techniques
Apply two coats of sanding sealer to prepare the surface well5. Check for any flaws between coats and sand with 320-grit paper to make it smooth5. Natural finishes work best with tung oil or boiled linseed oil, and you can buff with wax to get a professional shine45. White lacquer frames need several primer coats, and careful sanding between layers creates a glass-like finish5.
Wooden Phone Charging Station

Image Source: Instructables
A custom wooden charging station makes organizing electronic devices simple. This practical project keeps your workspace tidy and charges multiple devices at once.
Design Considerations
You’ll need stable hardwood with 5-6mm thickness to ensure durability46. Walnut plywood works best for its stability and looks great47. Your design should feature slots that go from big to small to fit devices of all sizes – from tablets to phones46. The station needs two main panels: one holds your devices while the other manages cables47.
Cable Management
The system centers around a 5-port charger46. You’ll want to drill 8-9mm diameter holes that match your charging connectors4. Cable tidy clips keep cords from falling when devices are unplugged46. You could also build a hidden space under the main platform to tuck away the charging hub46.
Assembly Instructions
- Cut wood pieces using paper templates as guides
- Create device slots with graduated sizes
- Route edges with a round-over bit to smooth finish
- Drill cable holes in strategic locations
- Mount cable management clips
- Secure charger inside the base compartment
- Apply finish to protect46
The assembly creates a solid base that holds devices at easy viewing angles4. Epoxy glue keeps the charging hub firmly in place inside the base and ensures reliable power to all connected devices46.
Kids’ Art Supply Organizer

Image Source: Small Stuff Counts
A well-organized art supply station helps kids stay creative and keeps their workspace neat. You can build this simple woodworking project to give your young artists dedicated spaces for their materials and make cleanup a breeze.
Material Selection
Engineered wood or MDF offers durability and economical solutions48. We used 1-inch x 6-inch x 6-foot common board for the main structure and added 2½-inch x 36-inch hobby boards for support48. MDF’s strength can handle heavy art supplies and stays free from BPA, PVC, and other harmful chemicals6.
Building Process
Cut the main board into two 4-inch pieces and one 12¾-inch piece48. The 4-inch boards should attach to the base with wood glue and brad nails. Two 14¼-inch hobby boards need to go across each side48. This assembly creates a solid foundation that holds art materials securely.
Storage Compartments
Your compartment design should match supply categories. Simple supplies like crayons and markers stay available up front, while messier items fit neatly in the back49. Small bins measuring 7.5 inches wide, 13 inches deep, and 4.25 inches tall work best for organization49. Clear containers help children spot their supplies quickly.
Safety Features
Round edges and anti-tip feet make this organizer safer50. The unit should attach to walls with proper brackets50. Kids can access their supplies safely thanks to pinch-free hinges and smooth surfaces50. A non-toxic, food-grade finish keeps the organizer free from harmful chemicals6.
Simple Wooden Bookends

Image Source: YouTube
Wooden bookends are both practical and beautiful, making them a perfect weekend project to organize your books. You can make these useful pieces for USD 19-267, and they’ll match any style of home decor.
Design Options
Pine, maple, or walnut each give your bookends a unique look7. The base piece needs to be 5½ inches wide by 6¼ inches long7. You can also build them with a stepped look by using pieces from 2½ inches to 4½ inches in width7.
Construction Steps
Start by cutting your wood pieces in decreasing sizes7. We sanded each piece really well before putting them together. Stack everything from largest to smallest and secure the layers with wood glue. The project ended up needing 1¼-inch brad nails for extra strength, placed ¾ inch from the edges7.
Finishing Methods
A smooth finish needs 120-grit sandpaper first, then 220-grit to get it just right51. Add thin layers of wood stain and sand between coats to get that professional look. Want a metallic touch? Mix champagne bronze spray paint with bright gold highlights7. A clear wood sealer protects your bookends from everyday use and helps them last longer52.
Desktop Paper Organizer

Image Source: YouTube
A customized desktop paper organizer revolutionizes your workspace and keeps documents and supplies in perfect order. This simple woodworking project helps you save desk space and keeps papers right where you need them.
Size Planning
The organizer fits standard paper sizes with a 13¼ inches width and 15 inches depth53. The height ranges between 12-15 inches based on what you need to store53. You’ll want to space the divider slots 1 inch apart for the best organization. This creates five separate compartments that each measure 5½ inches in height8.
Assembly Instructions
Start by cutting your MDF or hardboard to exact dimensions53. The base panel comes first, then move on to side panels and dividers. You’ll need to cut grooves into the side panels at set intervals so shelves can be adjusted8. Another option is to make dado cuts ½ inch deep if you want fixed dividers53.
Compartment Design
Adjustable shelves slide through the grooves, so you can customize based on your paper sizes8. The dividers feature curved front edges that make grabbing stored items easier53. A coat of wax on the grooves boosts shelf movement smoothness8. You might want to add rubber pads on the bottom to keep your desk scratch-free8.
This organizer handles paper of all sizes, from standard letters to legal documents54. With good planning and precise cuts, you’ll end up with professional results from this straightforward project.
Comparison Table
| Project Name | Build Time/Difficulty | Material Cost | Key Materials | Main Tools Required | Key Dimensions | Special Features |
|---|---|---|---|---|---|---|
| Rustic Floating Shelf | Beginner-Friendly | Not mentioned | 1/4″ cabinet-grade plywood, 1×2″ whitewood boards | Drill, level, carbide drill bit | Not mentioned | Holds 45-50 lbs per wall stud |
| Simple Wooden Serving Tray | Beginner-Friendly | Not mentioned | Maple, walnut, cherry, or pine | Sandpaper (80-220 grit), drill | 12″ x 18″ base | Food-safe finish options available |
| Modern Plant Stand | Weekend Project | $10-35 | Maple, poplar, or cedar | Jigsaw | 10″ circle top, 9-12″ height | Supports up to 75 lbs |
| DIY Wooden Doormat | Beginner-Friendly | Not mentioned | Cedar, redwood, or NZ Pine | Crosscut saw, drill, sandpaper | 30″ x 18″ | Weather-resistant design |
| Compact Shoe Storage Bench | Weekend Project | Under $30 | Two 2x8s, one 1×12 | Miter saw, pocket hole jig, drill | Not mentioned | Holds 3-4 pairs of shoes |
| Wall-Mounted Mail Organizer | Beginner-Friendly | Not mentioned | 1×10 whitewood boards | Level, drill | 36″ tall x 9¼” wide | Three evenly spaced slots |
| Simple Wooden Coasters | Quick Project | Not mentioned | Maple, cherry, or walnut | Sandpaper (120-320 grit) | 4″ x 4″ | Water-resistant finish |
| Simple Tool Storage Rack | 20 minutes | $10 | 2×4 lumber | Common hand tools | Not mentioned | Tool-specific spacing blocks |
| Decorative Picture Frame | Intermediate | Not mentioned | Not specified | Router, saw | 2.5″ frame width | UV-protective glass option |
| Wooden Phone Charging Station | Weekend Project | Not mentioned | Hardwood (5-6mm thickness) | Drill, router | Not mentioned | Fits multiple devices |
| Kids’ Art Supply Organizer | Weekend Project | Not mentioned | MDF or engineered wood | Brad nailer, saw | 7.5″ x 13″ x 4.25″ bins | Child-safe features |
| Simple Wooden Bookends | Weekend Project | $19-26 | Pine, maple, or walnut | Brad nailer, sandpaper | 5½” x 6¼” base | Customizable designs |
| Desktop Paper Organizer | Weekend Project | Not mentioned | MDF or hardboard | Saw, measuring tools | 13¼” x 15″ x 12-15″ | Adjustable shelves |
Last words
Beautiful, functional woodworking projects don’t need years of experience or expensive tools. These 13 projects give beginners a perfect start while delivering professional results. You can complete simple coasters in an hour or build a shoe storage bench over the weekend.
DIY versions save much money compared to retail prices. A modern plant stand costs $35 to build instead of $125 at stores. The tool storage rack needs just $10 in materials. You can customize these projects to fit your space and needs perfectly.
First-time woodworkers succeed easily with detailed material lists and clear instructions. Simple projects like wooden coasters help build confidence. Later, you can tackle complex builds like floating shelves or a charging station.
These weekend projects help create useful pieces for your home. Building something with your hands brings a deep sense of accomplishment. Choose a project that fits your skills and schedule, get your materials ready, and begin your woodworking trip today.
Access more info at
15 Best Tools for DIYers in 2025: A Homeowner’s Money-Saving Guide
FAQs
Q1. What are some easy woodworking projects for beginners? Some easy woodworking projects for beginners include building a rustic floating shelf, creating a simple wooden serving tray, constructing a modern plant stand, making a DIY wooden doormat, and crafting a compact shoe storage bench. These projects require basic tools and materials while helping develop fundamental woodworking skills.
Q2. How much do DIY woodworking projects typically cost? The cost of DIY woodworking projects can vary widely depending on the materials and tools required. For example, a basic tool storage rack can be built for around $10 in materials, while a modern plant stand might cost between $10-$35. Many beginner projects can be completed for under $30 in lumber costs.
Q3. What tools are essential for beginner woodworking projects? Essential tools for beginner woodworking projects include a drill, level, saw (such as a circular saw or miter saw), sandpaper of various grits, and basic measuring tools. As you progress, you may want to add tools like a router, pocket hole jig, and brad nailer to expand your capabilities.
Q4. How long does it take to complete a beginner woodworking project? The time required to complete a beginner woodworking project can range from as little as 20 minutes for a simple tool storage rack to a full weekend for more complex items like a shoe storage bench or desktop organizer. Many projects listed can be completed in a few hours, making them ideal for weekend crafting.
Q5. What types of wood are best for beginner projects? For beginner projects, easily workable woods like pine, poplar, or cedar are good choices. Plywood is also commonly used for its stability and affordability. As you gain experience, you can explore hardwoods like maple, walnut, or cherry for more refined projects. The choice of wood often depends on the project’s purpose, whether it’s for indoor or outdoor use, and the desired esthetic.
References
[1] – https://www.woodsmithplans.com/plan/wall-mounted-tool-rack/
[2] – https://www.woodshopdiaries.com/simple-diy-shoe-bench/
[3] – https://www.woodpeck.com/woodsmith-wall-mounted-tool-rack-plans.html
[4] – https://www.instructables.com/DIY-Wooden-IPhone-Charging-Dock/
[5] – https://astreetframes.com/special-projects/making-your-wood-frame-part-iii-finishing-2/
[6] – https://www.infansbaby.com/products/infans-wooden-toy-chest-wide-kids-toy-box-storage-space-with-safety-hinge-and-handles?srsltid=AfmBOoo4HrYDm8uORvqbqKbfne5fNUjRpKrJk1C79VbVFL3FI1rQqyuc
[7] – https://housefulofhandmade.com/easy-diy-bookends-wood/
[8] – https://www.craftsmanspace.com/free-projects/wooden-paper-sorter-plan.html
[9] – https://www.thesprucecrafts.com/free-diy-plant-stand-plans-4684420
[10] – https://abeautifulmess.com/diy-modern-wood-plant-stands/
[11] – https://www.lowes.com/pd/Style-Selections-Adjustable-Wood-Plant-Stand/5003467053
[12] – https://www.youtube.com/watch?v=X_tD71jOVFk
[13] – https://urbansproutsstore.com/products/adjustable-plant-stand?srsltid=AfmBOoqJyUo8d5cnDacBap9XVcCnjoX97A655L1PYaLE2wlSTlXPZNRm
[14] – https://www.heytherehome.com/west-elm-inspired-wooden-plant-stands/
[15] – https://www.personalcreations.com/product/welcome-wooden-doormat-30224200?srsltid=AfmBOopYcITc_dv605FJUVuHq_5ppRRXVGkuqBMH9gMMaRgwuFe3RnQC
[16] – https://www.manmadediy.com/2952-how-to-make-a-diy-wooden-welcome-mat/
[17] – https://www.vermontwoodendoormat.com/
[18] – https://thecraftsmanblog.com/how-to-make-a-wooden-doormat/
[19] – https://withinthegrove.com/how-to-build-a-wooden-doormat/
[20] – https://learn.kregtool.com/plans/entryway-bench-with-shoe-rack/
[21] – https://www.housebeautiful.com/lifestyle/organizing-tips/g24566145/shoe-storage-ideas/
[22] – https://modernbungalow.com/blogs/buying-guides/a-guide-to-finishing-touches-for-solid-wood-furniture?srsltid=AfmBOoq3tSxAD1eKk1cIcPbWuzCBIrl0SMYYh1hY83bhxCtXl709XREz
[23] – https://www.reddit.com/r/BeginnerWoodWorking/comments/y8374x/easiest_finish_for_shoe_rack_with_a_lot_of_narrow/
[24] – https://www.woodpeck.com/woodsmith-mail-organizer-plans.html
[25] – https://www.ana-white.com/woodworking-projects/wood-mail-sorter-key-hooks
[26] – https://foxhollowcottage.com/get-organized-diy-wood-mail-sorter-plans-tutorial.html
[27] – https://www.infarrantlycreative.net/wall-mail-organizer/
[28] – https://www.homedepot.com/c/ah/how-to-install-a-mailbox/9ba683603be9fa5395fab90b2bec3c6
[29] – https://www.woodenearth.com/blogs/wooden-blog/what-wood-is-best-for-coasters
[30] – https://www.woodshopdiaries.com/diy-scrap-wood-drink-coasters/
[31] – https://www.quora.com/What-is-the-best-way-to-finish-wooden-coasters
[32] – https://www.customcoastersnow.com/guides/wooden-coaster-design-ideas?srsltid=AfmBOoqAA_xzeSsm3ak-4T3SupmlEERWcqJJvTf4ksLwU_BSEyKZK75e
[33] – https://www.blacktailstudio.com/blog/diy-projects-live-edge-wood-coasters
[34] – https://sinhascreations.com/blogs/news/seal-wooden-handpainted-coasters?srsltid=AfmBOopA3RuyFF-wVmRSxsNAIvSiKd5VxHu_pIfRcfJie9LZj2ZkVAzX
[35] – https://gardentherapy.ca/natural-branch-coasters/
[36] – https://www.youtube.com/watch?v=ayZHgjIrhas
[37] – https://www.woodshopdiaries.com/easy-diy-yard-tool-organizer/
[38] – https://www.stanleytools.com/project-guides/how-build-garden-tool-rack
[39] – https://www.omnicalculator.com/everyday-life/picture-frame
[40] – https://www.frameusa.com/measuring-picture-frames-and-mats?srsltid=AfmBOooKRJcZFqnpd8svPD6nxdrcUfRYL6s-urKxX5baiyG4t-VkZN7H
[41] – https://www.woodworkingtalk.com/threads/how-to-secure-glass-in-wood-frame.48849/
[42] – https://woodshopcowboy.com/2013/06/19/this-week-in-the-shop-4-joints-for-picture-frames/
[43] – https://www.finewoodworking.com/project-guides/beginner-projects/fundamentals-frame-picture?srsltid=AfmBOop0cFk1Ja2Idmoe-CmtgX3uC-Z5XwyGaMyMdIdmMsGX-1HWtKYj
[44] – https://www.hometalk.com/diy/decorate/rooms/q-how-to-attach-glass-to-wood-picture-frame-978497
[45] – https://www.woodtalkonline.com/topic/2095-finish-on-a-picture-frame/
[46] – https://uniquecreationsbyanita.com/how-to-build-a-phone-charging-station/
[47] – https://www.mr-beam.org/en/blogs/news/handy-ladestation-aus-holz-selber-bauen?srsltid=AfmBOooz4oGb63YDy3IEyZvGuLER_UOoqcYPX7GK2qAv9bnfv7N1iZx4
[48] – https://www.homedepot.com/c/ah/how-to-make-an-art-supply-caddy/9ba683603be9fa5395fab9017d93a0de
[49] – https://www.lifewithlessmess.com/kids-art-supply-storage/
[50] – https://guidecraft.com/products/guidecraft-toy-storage-organizer?srsltid=AfmBOoqfpK9qrr_fQtSB4VxBNdMnCBqEzv-UXXi2Ax5wZs_IEzWcCl5C
[51] – https://treelineusa.com/finishing-techniques-for-wood-crafters/
[52] – https://thecraftedmaker.com/2015/03/diy-wood-bookends/
[53] – https://createandbabble.com/diy-paper-organizer/
[54] – https://www.ikea.com/us/en/cat/paper-media-organizers-10551/
[55] – https://shelfology.com/pages/the-ultimate-guide-to-floating-shelves?srsltid=AfmBOorhlR1XxdXXqcR0a7qMjSFpt9WcgttwO45EAAadCD3jyw00tLBw
[56] – https://www.jennasuedesign.com/kitchen-chronicles-diy-floating-rustic/
[57] – https://shelfexpression.net/pages/the-finishes-we-use?srsltid=AfmBOootl14rombsoQWyc3g4Jgt1330MSRHp8dbBU_xTOdYkq-7oO0cZ
[58] – https://www.quora.com/Which-wood-is-best-for-a-tray
[59] – https://www.homedepot.com/c/ah/how-to-build-a-serving-tray/9ba683603be9fa5395fab901b0433593
[60] – https://www.instructables.com/DIY-Wood-Tray/
[61] – https://learn.kregtool.com/plans/simple-tray-with-rope-handles/
[62] – https://www.reddit.com/r/woodworking/comments/zffmhl/drilling_holes_in_to_a_serving_tray_for_handles/
[63] – https://www.newhampshirebowlandboard.com/blogs/blog/13612445-food-safe-finishes-for-wooden-bowls-and-wood-cutting-boards
[64] – https://woodservingtray.com/blogs/news/4-best-finishes-for-wood-trays-that-are-dishwasher-safe?srsltid=AfmBOorfmCs2PqemulW2dlV13bTKxyZQavxolN7wm0eYAUyBY4I3V1pT
Discover more at:
Zyntra | Trend Nova World | News| Tech| Flair
For more information, contact us at support@trendnovaworld.com

Saiqa Khan is an award-winning researcher with 16+ years of experience in AI, technology, finance, health, sustainability, and digital marketing. With dual master’s degrees, she delivers expert, research-driven insights across multiple fields.